I apologize for this post coming a wee bit late (the bean counting aspect of my life was getting busier the last few weeks), but I've finally been able to sit down and bang this one out. A few weeks back, Lisa and I continued with the next installment for our Table Convivale supper club, the ingredient being soft-shell blue crab. Inspired by Mark Bittman and Melissa Clark and each of their features in the New York Times, we thought this could be the next best ingredient to conquer in the kitchen, mainly because we were in the prime season for fresh soft-shell crab. The season typically begins in May and continues throughout the summer months, where the blue crab "abandons its shell and starts to form a new one, making its sweet, briny, delicious meat -- usually incredibly tough to get at -- immediately accessible." During this molting period, the whole thing is pretty much edible. When soft-shell crabs are available on menus outside of the summer months, they're most likely ones that have been preserved and frozen so they can be enjoyed out of season.
Finding recipes was pretty easy, as most of them dictate the batter be flour or cornmeal and fry accordingly (including this and this). The hard part came when we were trying to narrow it down to a couple, simple recipes (one to start and one or two for the main course). It proved to be so tough that we got a tad ambitious. We picked one starter and three others to be our "main course" -- a medley of soft-shell crab. How many did that call for? Well, there's three of us (Lisa, Marcus, and me) and four recipes total. And if we each were gonna try an entire crab from each recipe, that left us with a whopping grand total of twelve crabs. Yup, we're that crazy.
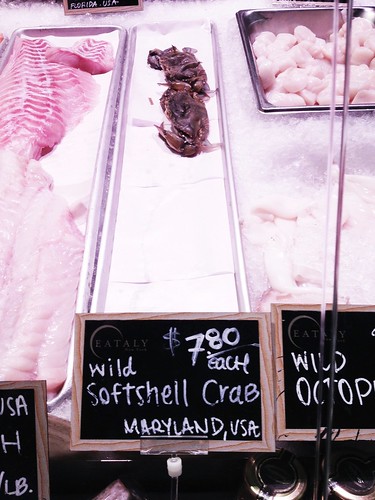
Now the next feat, as always, is to make sure the said ingredient that we'll be cooking that evening is normally readily available. I thought I had preemptively made sure of this because (1) I had seen them myself at Eataly when Lisa and I went there months earlier for our sea urchin conquest and (2) I even called Eataly that very day to made sure they had them in stock.
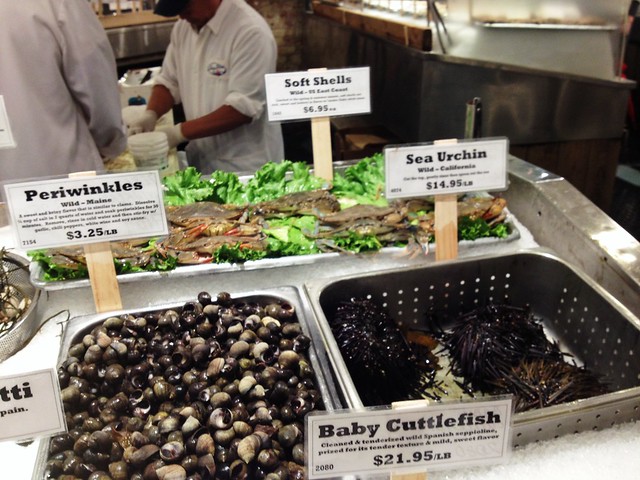
Now to my dismay, when I showed up that evening around 6 PM, there were only two measly crabs left at the fish department. Given our aggressive recipe list and the three mouths we had to feed, two soft-shell crabs just weren't going to cut it. Emergency mode commenced, and we starting Googling the next best place. I tried my luck with Whole Foods (a no-go), which left me with the Lobster Place over at Chelsea Market. I called, and we got so lucky -- they had plenty left in stock. When in doubt about seafood availability, chances are the Lobster Place will indeed have whatever it is you're looking for (most of the time, at least).

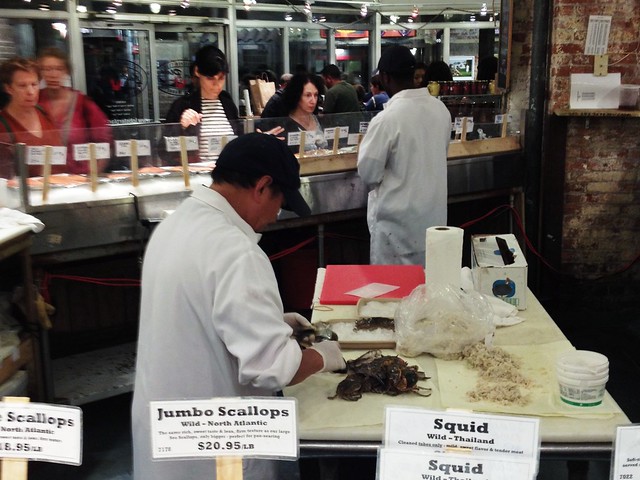
I rushed my butt over to Chelsea Market, getting to the shellfish section as fast I could.
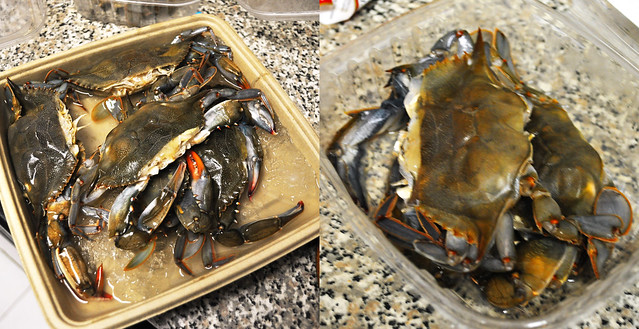
There they were, in all of their glistening glory, with many to go around.

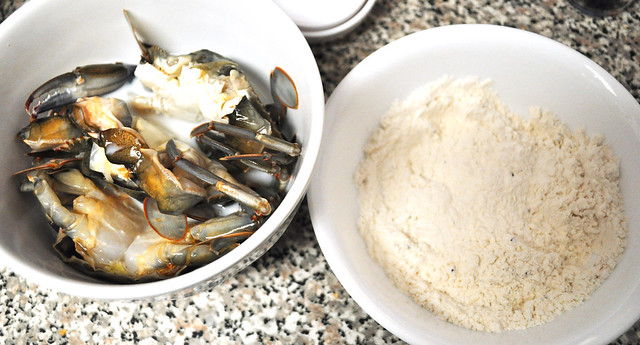
I asked for ten (since I already bought the remaining two from Eataly), and the fishmonger generously cleaned and prepped the crabs for me so they'd be fry-ready. So convenient!
{1} The crabs from Lobster Place were packaged in these flat containers over ice, while {2} the crabs from Eataly were cleaned and prepped in a plastic container.


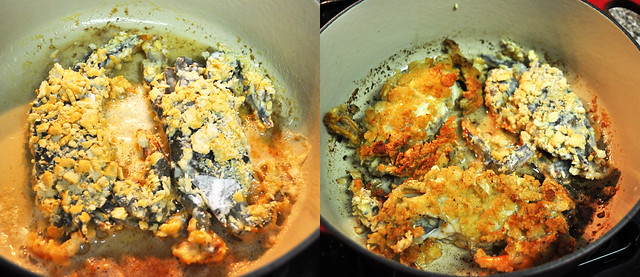
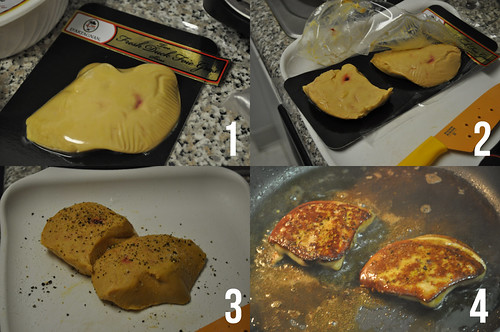
{1} After melting about two tablespoons of butter, we put the battered crabs right in over medium heat, sautéing {3} until golden brown, {2} turning the crabs only once, about three minutes per side.
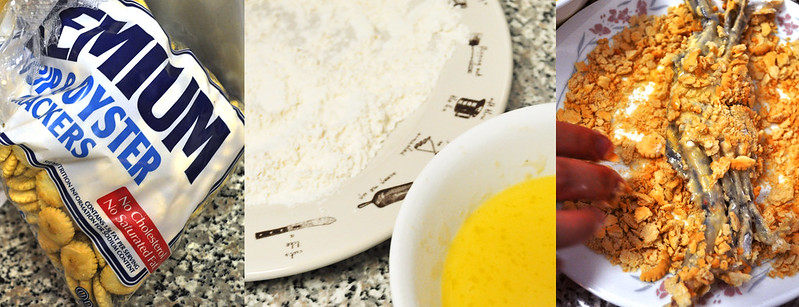
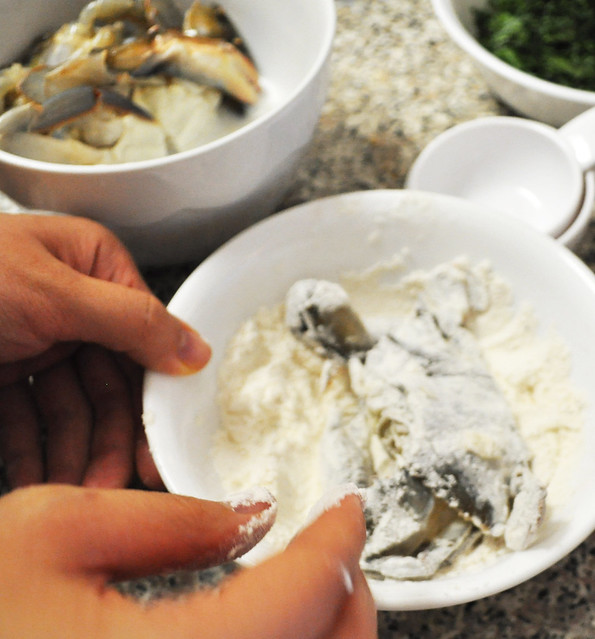
{1} We ground up one and a half cups of oyster crackers. Separately, we beat an egg with one cup of milk, {3} dredging the crab in flour followed by the egg mixture and flour (respectively), then finally the crackers.

A closet up of the soft-shell crabs from both places. Look at the beautiful gradient of green, brown, and blue!
Lisa checked to see how soft these crabs were, and indeed, they were incredibly soft, like cushions filled with plump crab meat.
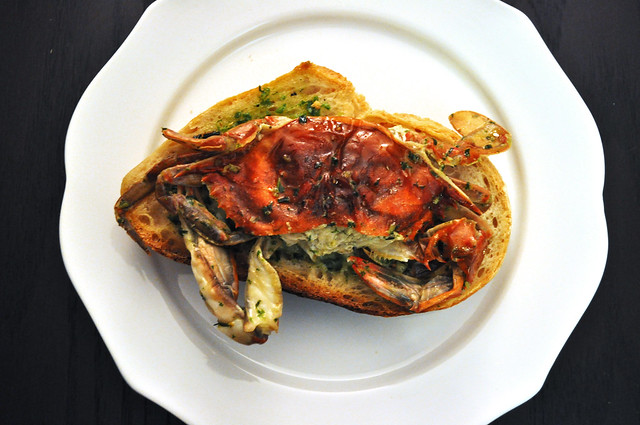
For our first course, we decided to go with the recipe for soft-shell crab crostini with arugula butter from "A Good Appetite" -- i.e., the recipe from Melissa Clark's column in The New York Times this past June.
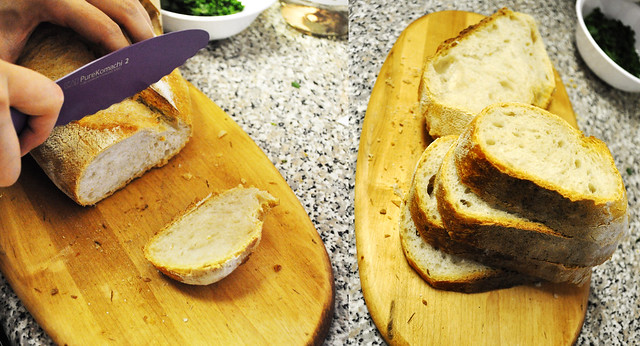
We cut an Italian loaf of classic, rustic bread from Eataly into thicker slices (for being able to withstand the weight of the butter and an entire soft-shell crab) and put it aside.
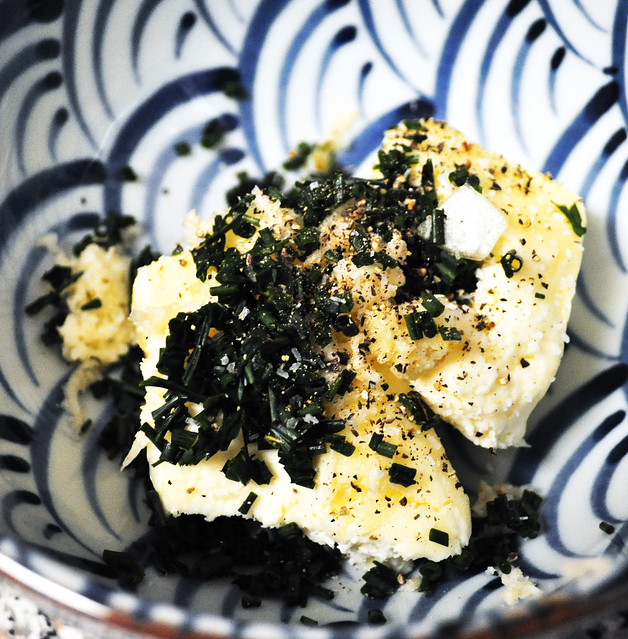
We combined a stick of room temperature butter with arugula, chives, garlic, salt, and pepper and then with some finely chopped.
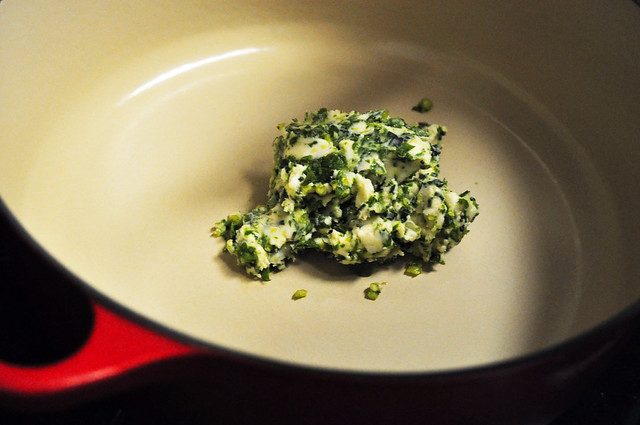
We then heated about half of the arugula butter mixture in a large skillet over medium-high heat.
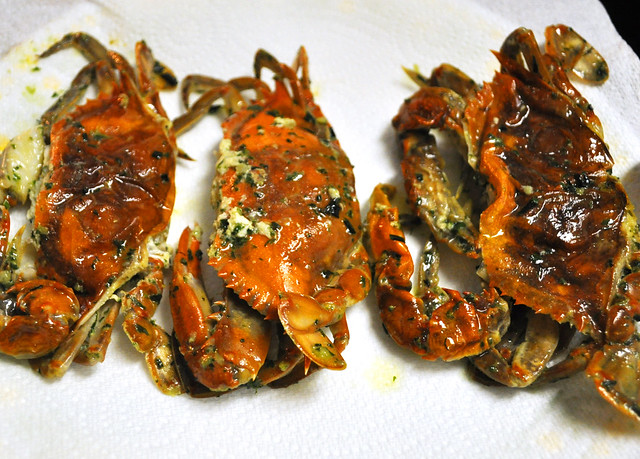
{1} Once the butter was bubbling, we added the soft-shell crabs in to cook, without moving, until crisp and golden, {2} for about two to three minutes per side.
Once the crabs were done, we transferred them to a papertowel-lined plate, sprinkling them with some salt. Look at those beauts!
Next, we preheated the broiler. Then we placed the sliced bread on a baking sheet, running under the broiler until they were browned and golden (only a couple minutes).
When the bread was thoroughly toasted, we spread the slices with the remaining arugula butter.
Then atop each buttered piece of toast, we placed a whole crab. Yup, and it tasted it as awesome as it looked. Buttery, crunchy, toasty, and juicy -- so simple, too! The browned butter glazed over their vellum-like shells gave it so much more flavor and depth to the entire crostini. That friendly kitchen adage -- that you can never have too much butter -- comes in handy here. This crostini recipe also makes for a super easy starter dish at any summer dinner party. We also did a separate test between the crabs from Eataly versus the ones from Lobster Place. We found that the ones from Eataly were slightly sweeter tasting, but the ones from the Lobster Place were plumper.
Per Lisa's request, the recipe we had to include amongst our main course crabs was the soft-shell crab meunière from French Revolution's blog.
This recipe called for a coating of milk and a light battering of flour, salt, and pepper for the crabs.
Battering of the crabs!
{1} After melting about two tablespoons of butter, we put the battered crabs right in over medium heat, sautéing {3} until golden brown, {2} turning the crabs only once, about three minutes per side.
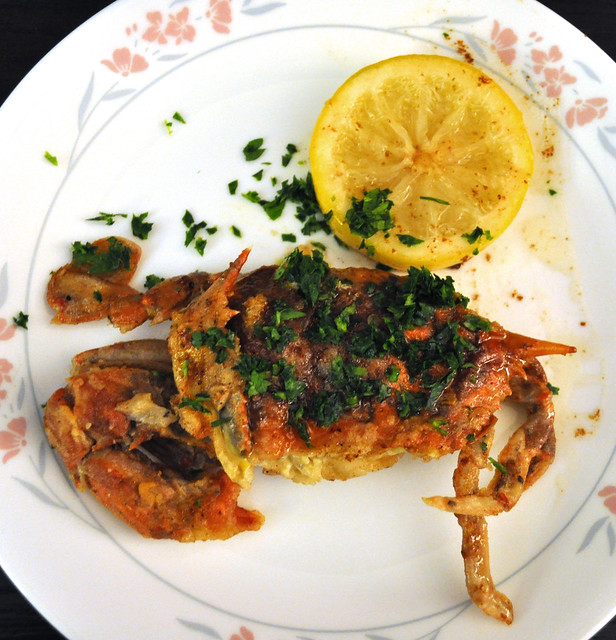
While the crabs were sautéing, we had a small saucepan on the side, melting two tablespoons of butter over medium-low heat. We continued to cook the butter until it turned a golden brown. Then we added in a thick lemon slice right into it.
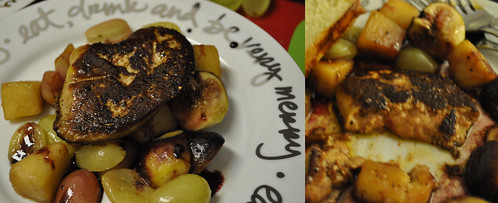
We arranged the crab on a plate, pouring the lemony butter right over it, garnishing with lemon and some parsley. The lemon butter gave the soft-shell crab a nice overlay of rich flavor. The light batter on the crab also added an additional crunch to the soft shells -- also a tad more aromatic than the crostini we had just made. Overall, it had the ideal batter-to-crab ratio, where the batter just highlighted the contours of the crab with some awesome browned bits and the crab was able to exhibit all of its natural flavors of plump, juicy, and tender meat.
Next up was one of Mark Bittman's variations that was featured in his most recent "study" of these seasonal crustaceans featured in the Sunday New York Times magazine. This "study" explored three methods (i.e., grilled, deep-fried, and sautéed), four coatings (i.e., simple flour/cornmeal, cornmeal batter, ground oyster crackers/saltines, and tempura), and five sauces (i.e., tomato, tartar, pesto, chili, and ponzu). We aimed to try the ground oyster crackers (because of its singularity as an ingredient) as well as the cornmeal batter (because it was the most quoted ingredient in our recipe search).
{1} We ground up one and a half cups of oyster crackers. Separately, we beat an egg with one cup of milk, {3} dredging the crab in flour followed by the egg mixture and flour (respectively), then finally the crackers.
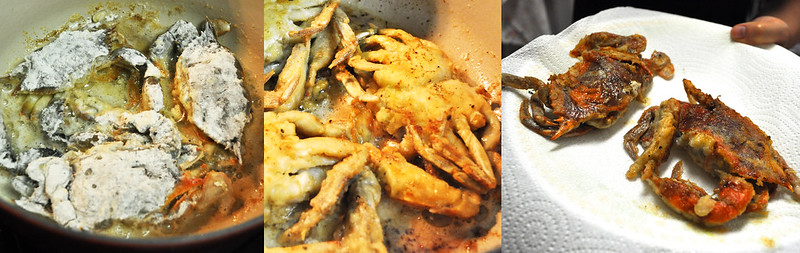
{1} We coated our pan generously with some butter, placing the cracker-battered crabs {2} to sauté, about three to five minutes per side.
And voilà -- we instantly had some oyster cracker-battered crabs! These were probably the heaviest out of the three, and surprisingly so, too! We thought that the butter sauce from the soft-shell crab meunière recipe would create the heaviest soft-shell crab, but the crumbled oyster crackers were quite filling (just think about eating a few handfuls of oyster crackers on top of a whole soft-shell crab).
Unfortunately our stomachs were way too full (can't complain at all though) from the three recipes we had executed that we were unable to follow through with a study of the cornmeal encrusted soft-shell crabs from Mr. Bittman's Times piece. Our eyes are always too big for our stomachs, but then again, there's always a next time! :P
Findings: This installment of Table Convivale proved to be another successful feat in the kitchen, only this time with the seemingly tricky (but in reality, not so much), seasonal soft-shell crab. Lisa's approach from the getgo? "Let's just fry these babies!" And that's what we did -- sautéed them in butter, three different ways (arugula butter over crostini, lemon butter with flour batter, and butter with ground oyster crackers), all of which helped us thoroughly understand the science behind delicate, molting blue crabs and the art of cooking them.
They're so easy to make (throw them in the pan with a little butter and herbs, battered or not, and you're set) and very satisfying for the palate. So don't let those claws scare you -- their soft and tender shells now allow its eaters to freely get to its sweet and plump meat without any crackers or mallets handy. So when May rolls around next year and the summer months are upon us once again, I certainly see some soft-shell crabs in my culinary future. You should, too!
Price point: $7.80 for each soft-shell crab from Eataly, $4.50 for a loaf of classic rustic Italian bread; $6.95 for each soft-shell crab from the Lobster Place.
--July 14, 2012
Lobster Place
75 9th Avenue
New York, NY 10011


